

Part 2 of the ARIA series: I had a working PRD-based workflow, so I rebuilt a feature with GitHub Spec Kit on a real .NET Blazor + Azure app to see whether the extra structure pays off.
In the first post, Building an Azure resources inventory app with Claude Code CLI and Blazor, I built ARIA (Azure Resources Inventory App), a small Blazor application created almost entirely with Claude Code. The workflow was deliberately simple: a single PRD.md file, Claude treating it as the source of truth, and the feature built from there.
It worked surprisingly well.
But it raised a question. As projects become larger and features become more complex, is a single requirements document enough? Or does AI-assisted development benefit from a more structured process?
GitHub Spec Kit is one attempt to answer that question. Instead of relying on a single document, it introduces a spec-driven workflow with separate stages for requirements, planning, task generation, and implementation.
Rather than debating the theory, I wanted to try it on a real feature. In this post, I add a details view for Azure Function Apps to ARIA, allowing users to see key properties and the functions contained within an app. The feature itself is straightforward; the interesting part is how the development process changes when Spec Kit replaces a traditional PRD.
By the end, I’ll compare both approaches and share where I think the extra structure helps, and where it might simply be unnecessary overhead.

If you did not read the first post, the short version is this: you do not need to know Blazor to follow along, you only need to be comfortable reading C#. The new thing here is Spec Kit, so most of the post is about how that tool changes the workflow, not about the framework. Spec Kit is built on skills, a Claude Code feature. If that word is new to you, there is an appendix at the end explaining what skills are, which you can read first or skip.
Prerequisites
- The ARIA project from the first post
- Claude Code with an active subscription (Pro or higher recommended for this kind of project work)
- uv installed (Spec Kit uses it to run its CLI). On Windows systems winget install astral-sh.uv or the install script from the uv docs is enough
- An Azure subscription with at least one Function App, so the details view has real data to show
- The first post’s habit: Git from the start, and commit after every working feature
What is Spec Kit? (And why try it)
In the first post our requirements lived in a single free-form PRD.md. That worked, but I had to invent the structure myself and keep it tidy on my own. GitHub Spec Kit is a small toolkit from GitHub that gives that same idea a fixed shape. It calls the approach Spec-Driven Development. Instead of one free-form document, you move through clear phases: first the project principles, then a specification of what you want, then a technical plan, then a task list, then the implementation. Each phase produces its own file, and your AI agent reads them in order.
The reason I want to try it on a real feature is simple. The PRD approach put all the weight on me to keep the document good. Spec Kit pushes some of that work into a process, with its own commands and checks. I do not know yet if I like it more than my own PRD. That is the point of this post, to use it on something real and see.
One thing to be clear about: Spec Kit does not replace Claude Code. It runs on top of it. After you set it up, you get a set of new slash commands inside Claude Code, and Claude is still the one writing the spec, the plan, and the code.
A note on modes before we start.
Something changed since the first post that is worth a quick word before we begin. Back then Claude Code had three modes: default, auto-accept, and plan. I leaned on plan mode a lot, so Claude would read the PRD, think through the work, and propose a plan before touching any code.
Since then Claude Code added a new one called auto mode. Claude runs its edits and commands on its own, without asking you to confirm each step, but a background safety classifier checks every command first and blocks anything risky. So you get speed without dropping all the guardrails. You still cycle modes with Shift+Tab, which now includes auto.
For this walkthrough I run everything in auto mode and skip plan mode. The reason is Spec Kit: all the planning now lives in the spec, plan, and tasks files I have already reviewed, so I do not need Claude to stop and plan again, only to carry out what those files describe.
One note on availability: auto mode is a newer feature and is not on every plan. If you do not see it in the Shift+Tab cycle, use auto-accept mode instead, which gives you a similar hands-off run for this kind of work.
Step 1: Add Spec Kit to the project.
Open the ARIA folder in VS Code and open a terminal. We will initialize Spec Kit inside the existing project, not create a new one. The simplest way is to run it once with uvx, so nothing is installed permanently on your machine:
uvx --from git+https://github.com/github/spec-kit.git@v0.11.3 specify init --hereNote the @v0.11.3 at the end of the URL. That pins Spec Kit to a fixed release. If you leave it out, uv builds the latest commit on the main branch, and if that commit happens to be broken you get a crash on start like ModuleNotFoundError: No module named ‘specify_cli.bundler.lib’. Pinning to a release tag avoids this. Use the newest tag from the Spec Kit releases page, it was v0.11.3 when I wrote this.
This runs Spec Kit straight from GitHub. The –here flag tells it to set up in the current folder instead of creating a new project folder. I am not passing an agent flag on purpose. Spec Kit is not tied to Claude Code, it works with several AI agents, so when you run init it asks which one you use and sets up the command files for it. Pick Claude Code from the list, but know that you could pick another agent here and the rest of the workflow would be the same.
Init also asks one more thing: which script type you want, bash or PowerShell. This decides the language of the helper scripts Spec Kit installs. On Windows pick PowerShell, on macOS or Linux pick bash. It does not change how you use Spec Kit, only the scripts it writes under the hood. I picked PowerShell, which is why the scripts you see later are .ps1 files.
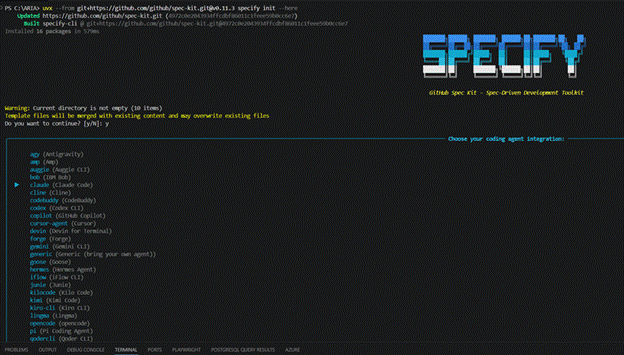
After the init finishes, you can confirm Spec Kit set itself up correctly and found Claude Code with:
uvx --from git+https://github.com/github/spec-kit.git@v0.11.3 specify check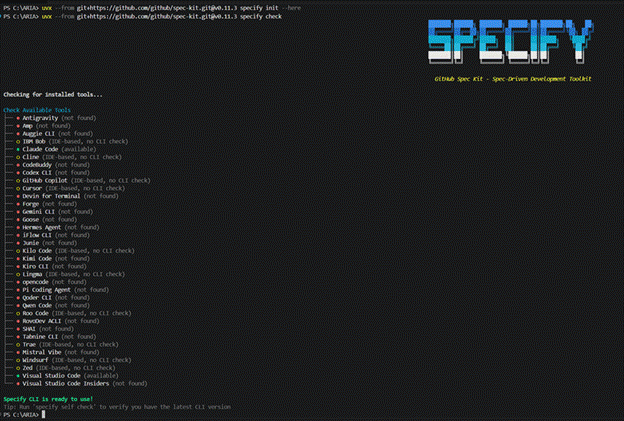
When it finishes, look at your project. Spec Kit added two new folders. Commit them now, before you change anything, so you have a clean starting point.
What init created…
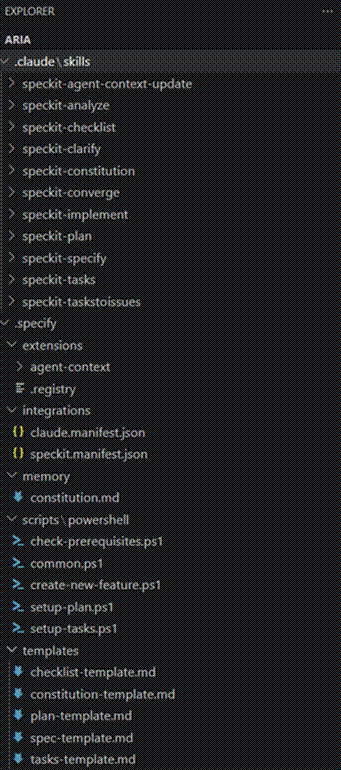
It helps to understand the two folders before we start, because this is the whole machine behind those slash commands.
The first folder is .claude/skills. Each item in it is one Spec Kit command, written as a skill. A skill here is just a set of instructions that tells Claude how to run that step. So speckit-specify, speckit-plan, speckit-tasks, speckit-implement and the rest are not magic built into Claude. They are prompts that Spec Kit installed for your agent. This is also why the folder is under .claude: it was created for Claude Code because that is the agent I picked at init. If you picked a different agent, the same skills would be written in that agent’s format instead. This is the part that makes Spec Kit agent-independent.
The second folder is .specify, and it holds the parts that are the same no matter which agent you use:
- templates has the shape of each document Spec Kit produces: spec-template.md, plan-template.md, tasks-template.md, and so on. When you run a command, the skill fills one of these templates instead of writing a document from nothing. That is why your spec and plan come out with a consistent structure every time.
- scripts has small helper scripts (here in PowerShell, since I am on Windows). The skills call them to do the plain mechanical work that should not be left to the model, like checking prerequisites, creating the feature branch and folder, or setting up the plan and tasks files. Keeping this in scripts makes it reliable and repeatable.
- memory holds constitution.md, the project rules we will write in the next step. It sits here because it applies to every feature, not just one.
- integrations has the manifest files that record which agent Spec Kit set up for. You can see claude.manifest.json here, which is the proof that init wired everything for Claude Code.
So the flow is simple to picture: you type a slash command, Claude runs the matching skill from .claude/skills, the skill calls a script in .specify/scripts to set up files, then fills a template from .specify/templates, all while following the rules in .specify/memory/constitution.md. You do not edit any of this by hand. It is good to know it is there so the commands stop feeling like a black box.
Step 2: The Spec Kit commands.
Start Claude Code in the project folder the same way as before. First make sure you are on the latest version, like in the first post:
claude updateThen start Claude Code in the project folder:
claudeSpec Kit shows up as a group of slash commands, all starting with /speckit-. They are meant to be run in a fixed order, because each one feeds the next. Here is the full lifecycle:
/speckit-constitution → /speckit-specify → /speckit-clarify → /speckit-checklist → /speckit-plan → /speckit-tasks → /speckit-analyze → /speckit-implementOne of them you run only once for the whole project:
- /speckit-constitution – set the rules the whole project must follow. You do this a single time, not for every feature.
The next four are the backbone you go through on every feature:
- /speckit-specify – describe what you want to build. The what and the why, not the tech.
- /speckit-plan – give the tech stack and let Claude write the technical plan.
- /speckit-tasks – turn the plan into a list of concrete tasks.
- /speckit-implement – build the feature from the tasks.
The rest are optional quality gates. You can skip them and the workflow still runs, but they catch problems early:
- /speckit-clarify (optional, runs after specify and before plan) – Claude scans the spec for unclear or missing parts and asks you targeted questions, then writes your answers back into the spec.
- /speckit-checklist (optional, runs after clarify and before plan) – generates a quality checklist for the spec itself, a kind of unit test for your requirements. It checks whether the spec is complete, clear, and consistent, not whether the code works. You can point it at a specific area like security or UX.
- /speckit-analyze (optional, runs after tasks and before implement) – a read-only check that compares the spec, plan, and tasks against each other and flags gaps, contradictions, or anything that breaks the constitution.
Most of these commands take no argument. Spec Kit knows which feature you are on from your current Git branch, the one it created during specify (like 001-function-app-details), so it works on that feature’s files automatically. An argument is only a focus hint, like /speckit-checklist security. The exception is /speckit-specify, where the argument is the description of what to build, so without it Claude will just ask you.
Why this matters: in the first post I jumped from the PRD straight to “implement the feature”. Spec Kit splits that into smaller steps, each a file you can read and correct before the next one builds on it. Slower at the start, faster once the feature is not small.
Step 3: Write the constitution.
Tip: like in the first post, you do not have to write these prompts by hand. You can explain what you want in plain words and finish with “Write a prompt for this”, and let Claude write the prompt for you. It knows which words and structure work best for itself, so the result is often better than what you would write yourself, especially if English is not your first language.
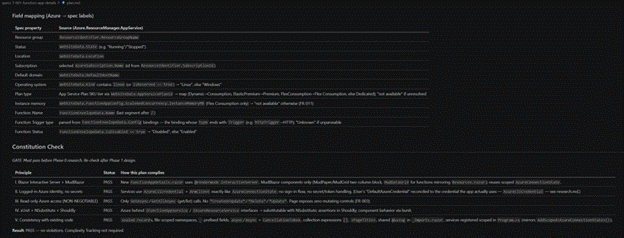
The constitution is the set of rules that apply to every feature, not just this one. Think of it as the part of CLAUDE.md that never changes. You can run /speckit-constitution with no argument, and Claude will scan the codebase and draft a constitution from what it finds. Any argument you pass is just extra focus on top of that, the rules you want it to be sure to include. I prefer to state those rules myself, so here is the prompt I used:
/speckit-constitution Create the principles for this project.
- The app is a Blazor Interactive Server app using MudBlazor for all UI components.
- All Azure access uses the credentials of the user who is already logged in via "az login". The app never handles passwords or secrets.
- The app only reads from Azure. It must never create, change, or delete any Azure resource.
- Tests use xUnit with NSubstitute for mocks and Shouldly for assertions.
- Stay consistent with the existing code. Scan the current components, services, and tests first, infer the conventions from them, and follow those conventions rather than inventing new ones.
- Requirements live in the Spec Kit spec files. The PRD.md from the previous work is no longer the source of truth, so do not read, follow, or update it. Use the spec for the current feature instead.
Claude will write these into a constitution file. Read it once. This file is short but it does a lot of work later, because Claude checks the plan and the code against it. In my case the constitution came out like this:
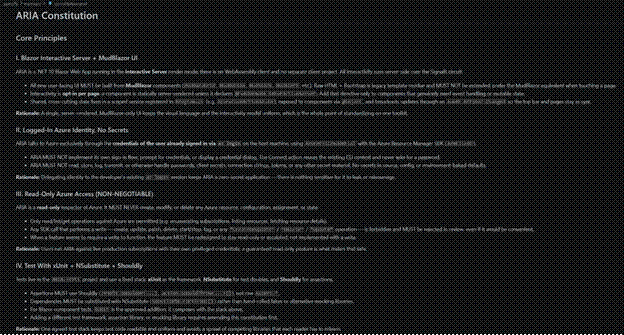
One thing to keep in mind, the same as in the first post: the documents Spec Kit produces will not look the same for you. Claude is a large language model and its output is non-deterministic by nature, so the constitution, the spec, the plan, and the tasks will be worded and structured a bit differently each time, even from the same prompt. Do not expect your files to match mine line for line.
Step 4: Specify the Function App details feature.
Now the actual feature. With /speckit-specify you describe what you want in plain language. You stay away from the tech here. No talk of which Azure SDK package or which MudBlazor component, only what the user should see and be able to do. Here is the prompt I used:
/speckit-specify Add a details view for Azure Function App resources.

When the user clicks a resource of type Function App in the resources grid, the app opens a details page for that function app.

The details page shows these properties at the top:
- Resource group
- Status
- Location
- Subscription
- Default domain
- Operating system
- Plan type
- Instance memory

Below the properties, the page shows the list of functions inside that function app. For each function, show:
- The function name
- The trigger type (for example HTTP, Timer, Queue)
- The status (enabled or disabled)

If the function app has no functions, show a clear empty message instead of an empty table.
The user can go back from the details page to the resources grid.
This view is read-only. No property can be edited from here.

Write a user story and acceptance criteria. Ask me questions if anything is unclear before writing the spec.
While writing the spec, Claude may stop and ask you a few questions about the parts it finds unclear. These questions will be different for each user, because Claude adapts them to what you wrote and to your answers, so do not expect the same ones I got. One thing I made sure to state in my answers is that the function app data must be live, read from Azure through the SDK, not mocked or hardcoded. If Claude does not raise this on its own, say it clearly, so the spec captures it from the start.
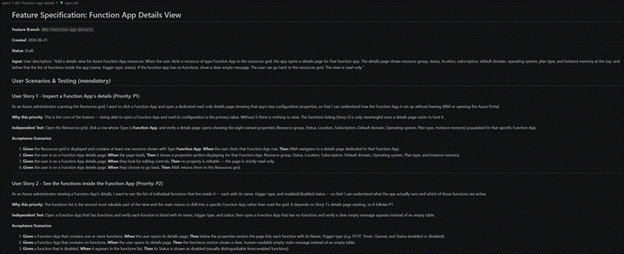
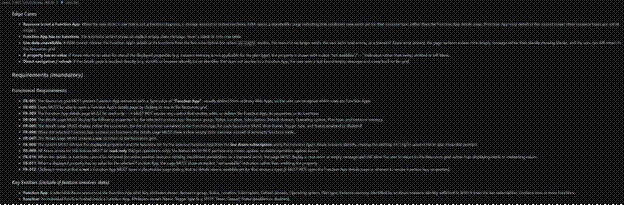
Claude creates a new feature folder under specs with a spec.md file. Read the spec. This is the moment to catch a wrong direction, while it is still words and not code.
Step 5: Clarify before planning.
Do not rush to the plan. Run:
/speckit-clarifyNote: if your session ended in the meantime, or you ran /clear, Claude may no longer know which feature you are on. In that case point it at the spec in the argument, for example:
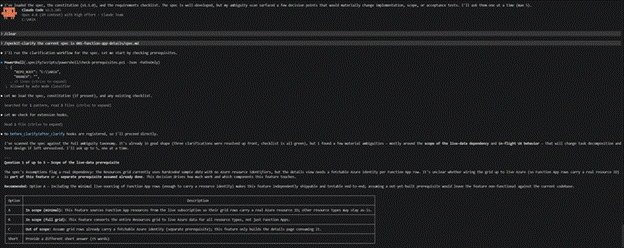
/speckit-clarify the current spec is 001-function-app-details/spec.mdThis makes Claude go back through the spec and ask about the parts that are still open. You can see the questions it asked me in the screenshots below. As before, yours will be different.
Why this step helps: these are exactly the small decisions that, if left open, Claude would guess on its own during implementation. Answering them now is much cheaper than fixing a wrong guess in the code later.

Step 6: Check the spec with a checklist.
With the open questions answered, it is worth testing the spec before building a plan on top of it. Run:
/speckit-checklistYou can aim it at a specific area, for example /speckit-checklist security or /speckit-checklist ux, when one part of the feature needs extra care. For this feature I ran it with the ux focus, since the work is mostly about how the details page and the functions list are shown to the user:
/speckit-checklist uxClaude writes a checklist file full of yes/no questions about the spec itself, not about the code. Each item either points to the spec section that covers it, or is marked as a gap when the requirement is missing, vague, or not measurable. So this is a quality test for the requirements, a kind of unit test for what you wrote in plain English.
Nothing here blocks you. The checklist is advisory. If it finds gaps, you fix them in the spec, either by editing it or by running /speckit-clarify again, and then move on. I run this before the plan on purpose, so the requirements are solid before any technical design is built on them. If you wait until after the plan and the checklist forces a spec change, you have to run the plan again, which overwrites the plan you already reviewed.

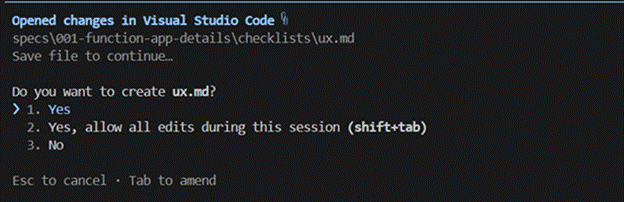
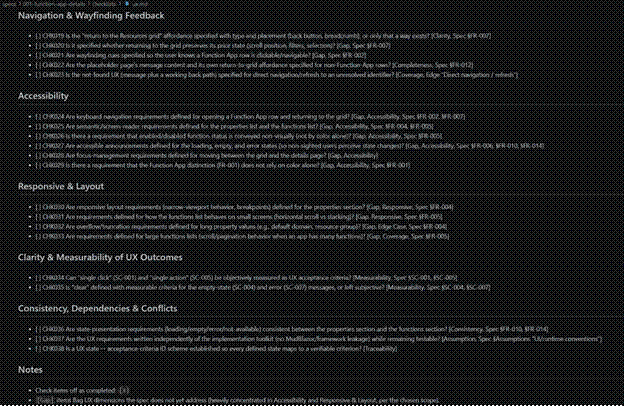
In my case it generated a lot of items to address. You can work through them by editing spec.md directly, or by running /speckit-clarify again to answer them one by one. For simplicity I did not address any of the checklist items here and let Claude make the decisions on its own. On a real feature you would want to go through them, but for this walkthrough I wanted to keep moving.
Step 7: Plan the implementation.
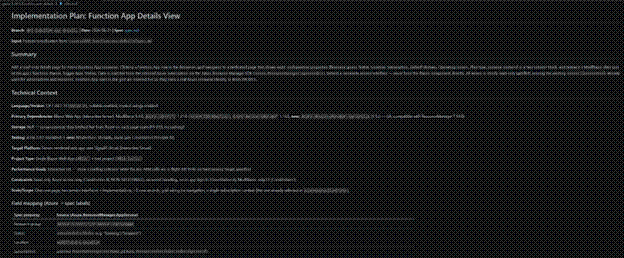
Now the tech. Run /speckit-plan and give Claude the stack and the constraints. This is where you name the Azure SDK and the UI pieces:
/speckit-plan
Use the Azure SDK for .NET to read the function app data, with the same DefaultAzureCredential the app already uses for subscriptions and resources.
Read the function app properties and the list of functions through the Azure Resource Manager libraries.
Put the Azure calls behind a service with an interface, so it can be mocked in tests. Do not put Azure calls directly in the Blazor component.
Reuse the existing MudBlazor styling. The properties block should use a simple two-column layout, and the functions list should use a MudBlazor data grid like the resources page.
Map the raw Azure fields to the labels in the spec. For example, default domain comes from the default host name, and operating system comes from whether the app runs on Linux or Windows.
Claude writes a plan.md. Read it and check two things: that it respects the constitution (read-only, service behind an interface, MudBlazor) and that it maps each property in the spec to a real source. If something is vague, say so and run the plan again.
Side note: I did not know the exact Azure package names by heart. I described what I wanted in plain words and let Claude pick the libraries in the plan. Then I checked its choice against the Azure docs. This is fine, you do not need to memorize SDK names to use this workflow.
Step 8: Generate the tasks.
Run:
/speckit-tasksClaude turns the plan into a tasks.md with a numbered list of small steps: create the service interface, implement it with the Azure SDK, add the page, wire the grid click to open it, add the tests, and so on. Read this list. It is a good preview of how much work the feature really is, and you can still reorder or cut tasks here.
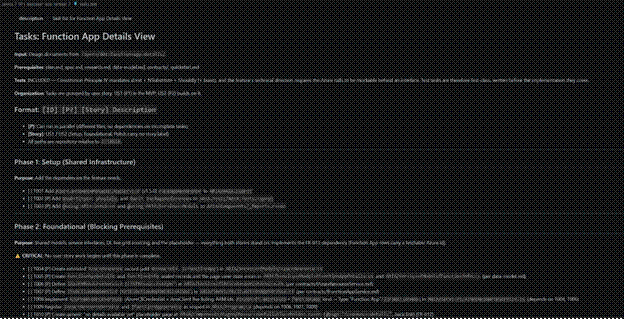
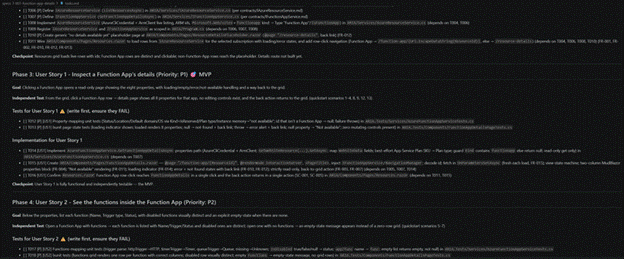
Before building, I run one more check:
/speckit-analyzeThis compares the spec, the plan, and the tasks and points out anything that does not line up, like a property in the spec that no task covers. Fix any gap it finds before you implement.
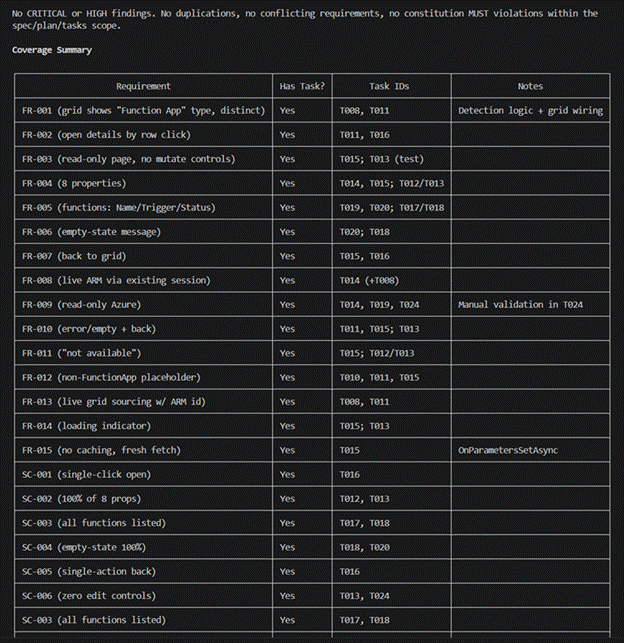
Step 9: Implement.
When the spec, plan, and tasks all look right, build it:
/speckit-implementClaude works through the task list and writes the code. When it finishes, press F5 and try the feature. Click a function app in the resources grid. You should land on the details page with the eight properties at the top and the list of functions below, each with its trigger type and status.
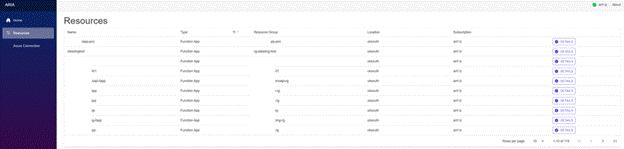
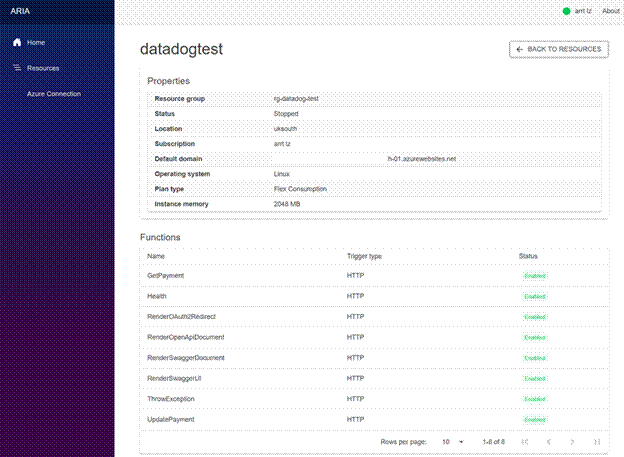
Changing something later.
Once the feature exists, you will want to tweak it, for example change how the details page looks. Treat each change as a feature too. If it carries real behavior (new interaction, new state, new edge cases), run it through the lifecycle, using the lean path of specify, plan, tasks, implement when it is small. If it changes an existing feature, switch back to that feature’s branch and update its spec, by running clarify again or editing spec.md, then re-run plan and tasks so they match. A purely cosmetic tweak, like a label or column order, does not need all this. You can just ask Claude directly, and update the spec afterward so it stays the source of truth.
When something does not work.
This part is the same lesson as the first post, so I will keep it short. Spec Kit does not prevent bugs. You will still hit them, and the way to deal with them is the same as in the first post. When the page throws, do not start editing the generated service yourself. Tell Claude what broke and let it fix its own work.
The pattern that works for me is still: describe the symptom in one sentence, paste the actual error in full, and say what you already tried. For this feature the most likely problem is permissions. Reading a subscription is one thing, reading inside a function app needs your account to have rights on that resource. A prompt like this gets a useful answer fast:
The Function App details page loads, but the functions list is always empty, even for a function app that has functions in the Azure portal.
In the Debug Console I see this:
Azure.RequestFailedException: The client 'me@example.com' with object id '...' does not have authorization to perform action 'Microsoft.Web/sites/functions/read' over scope '...'.
I am logged in with az login and az account show returns the correct subscription. The app was restarted after the last change. Is this a permission problem or a code problem, and how do I tell the difference?
Claude will usually read the error and tell you whether it is your Azure role or its own code. If it proposes a fix that hides the problem, for example catching the error and showing an empty list as if that were normal, push back and ask for the real cause. The model takes the easy path sometimes if you let it.
Wrapping up.
We now have a Function App details view in ARIA, built through GitHub Spec Kit instead of one free-form PRD. The user can click a function app, see its main properties, and see the functions inside it with their trigger type and status.
On the question I started with, whether Spec Kit beats my own PRD.md, my honest answer after one feature is: it depends on the size of the work. For a small change the extra steps feel heavy, and a short PRD or a plain chat prompt is faster. For a feature with real moving parts, like this one, splitting it into constitution, spec, clarify, plan, tasks, and implement caught decisions I would have left open with my old approach. I will keep using it for the bigger features and decide as I go.
A few things worth taking from this post:
- Spec Kit runs on top of Claude Code, it does not replace it. You still get Claude doing the work.
- The clarify and analyze steps are where the value is. They catch the open decisions before they turn into wrong code.
- Keep the spec free of tech and put the tech in the plan. Mixing them makes both harder to review.
- Git is still non-negotiable. Commit after init, and commit after the feature works.
From here you can keep adding features the same way, for example a details view for other resource types, not only function apps. In the next post I want to take a different turn: we will build an MCP server and look at how the protocol actually works.
Appendix: what skills are.
Everything in this post runs on skills, so here is what a skill actually is, even outside of Spec Kit.
A skill is a folder with a SKILL.md file inside that gives the agent extra instructions for one specific job. So a skill is just a set of new instructions for the agent, not a change to the agent itself. The model does not learn anything, it simply reads these instructions when the job comes up. You add a capability by dropping in a folder.
The content of a skill is more than plain text. A SKILL.md can hold step by step instructions in markdown, but it can also point to files that ship in the same folder: templates to fill, reference documents, example data, and scripts. And yes, a skill can run commands. The instructions can tell the agent to execute a bundled script or a CLI command, and the agent runs it through its own shell. This is exactly what Spec Kit does when its skills call the PowerShell scripts in .specify/scripts to create a branch or set up files. So a skill is not only knowledge, it can also do real work on your machine.
Spec Kit is one example: each speckit-* folder is one skill, and together they give Claude the instructions for the whole spec-driven workflow. But skills are general. A few other things people build them for: creating Word, Excel, or PDF files in a fixed company format; running your project’s test suite and reading the results; following a code review checklist before every commit; generating an image and dropping it into a document; or pulling data from an internal tool and shaping a report. You can write your own skills the same way for any task you repeat often.
At the top of every SKILL.md there is a small block called frontmatter. It is a few lines between — markers that hold the metadata for the skill, mainly its name and a one line description of when to use it. This block is the only part of the skill the agent keeps in view all the time.
The body of the skill, which is the long part with the real instructions, is not loaded until it is needed. The agent reads the frontmatter of every skill, and when your request matches a description, only then does it load that full SKILL.md and follow it. This is what people mean by skills being loaded dynamically, or on demand.
Why this is good: the context window is limited, and the more you keep in it at all times, the slower and less focused the model gets. This is the same problem the /clear command solved in the first post. If all the instructions for every skill were always loaded, the window would fill up fast. With dynamic loading, only the short descriptions stay in view and the heavy instructions arrive only when they are actually used. So a skill is also a clean way to break a big pile of instructions into smaller pieces that the agent pulls in only when relevant, instead of carrying everything at once.
Normally you should not call a skill by its name. The better design is that the agent picks the skill on its own. That is the whole reason the description in the frontmatter exists: the agent reads it, compares it to what you asked, and loads the skill when it fits. You just describe your problem in plain words, and the right skill gets pulled in without you knowing its name. Naming skills by hand defeats this, because then you have to remember every skill you installed.
Spec Kit goes the other way on purpose. Its skills are invoked by name, through the /speckit-* slash commands. The reason is that spec-driven development is an ordered process with clear gates: first the constitution, then specify, then clarify, then plan, then tasks, then implement. You do not want the agent to decide on its own whether it is time to write the spec or time to write the code. You want to run each step yourself, in order, and check the result before moving on. Calling them by name gives you that control. So this is a case where invoking by name is the right choice, even though for most skills it would not be.

Author: Damian Sliwinski
Azure Integration Developer



follow us