
If you have written C# before but never touched Blazor, you should still be able to follow along. The point of using an AI coding tool is that you do not need deep framework knowledge to get started.
Prerequisites
- .NET SDK (latest LTS)
- Visual Studio Code
- C# Dev Kit extension for VS Code
- Claude Code with an active subscription (Pro or higher recommended for this kind of project work)
- Some experience with C#
- No prior Blazor experience required
Use Git from the start
Git is strongly recommended when working with Claude Code. Every time Claude makes a change, you can see exactly which files were modified and what was added or removed. This makes it easy to review the work, revert mistakes, and keep a clean history of the project. Without Git you are flying blind – and at some point you will want to roll back a change that broke something.
Step 1: Create the Blazor project
We will create an Interactive Server Blazor app (SignalR-based) from the command line, plus an xUnit project for tests. The whole thing will live in a single solution called ARIA.
Create a folder called ARIA, open it in VS Code, and run the following commands in the terminal:
dotnet new sln -n ARIA
Creates a new solution file.
- dotnet new blazor -o ARIA –interactivity Server
- Creates the main Blazor application.
- dotnet new xunit -o ARIA.Tests
- Creates the unit test project.
- dotnet sln add ARIA/ARIA.csproj ARIA.Tests/ARIA.Tests.csproj
- Adds both projects to the solution.
- dotnet add ARIA.Tests/ARIA.Tests.csproj reference ARIA/ARIA.csproj
- Adds a reference from the test project to the main project, so tests can see the application code.
- dotnet test
- Runs the tests. At this point you should see one passing test from the default xUnit template, which confirms the setup works.
To run the app, open the Run and Debug panel (Ctrl+Shift+D) and click Run and Debug. Select C# Debugger, then Launch Startup Project, and pick ARIA/ARIA.csproj. Press F5 and the default Blazor template should open in your browser.

Step 2: Start Claude Code CLI
In the terminal, first make sure you are on the latest version:
- claude update
- Then start Claude Code CLI in the project folder:
- claude
On first run Claude will ask you to trust the folder. Confirm, and you should see the Claude CLI prompt.

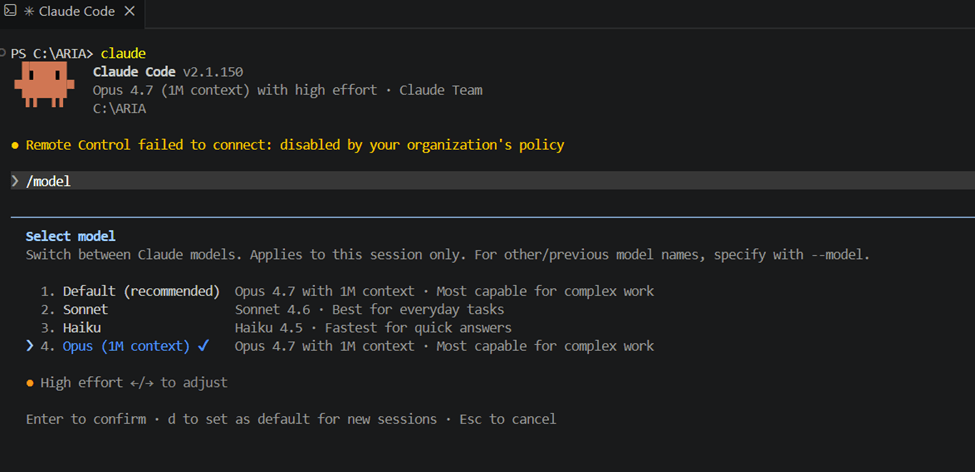
Picking a model with /model
Before doing anything else, check which model Claude Code is set to use. Run:
- /model
This opens a menu where you can switch between the available models. For this project I picked the newest Opus – at the time of writing that is Claude Opus 4.7, the most capable model Anthropic ships.
Why Opus and not a cheaper option:
- Better at planning. We will be using plan mode a lot, and the quality of the plan directly decides the quality of the implementation. A stronger model proposes cleaner architecture and notices more edge cases.
- Better at reading the whole project. Once CLAUDE.md and PRD.md grow, the model has to hold a lot of context in its head and still make consistent decisions. This is where Opus pulls ahead of the smaller models.
- Fewer rounds of fixes. In my experience the time saved on “that is not what I asked for, try again” easily makes up for the higher cost per token.
That said, Opus is not free. If you are on a usage-based plan and you are doing simple, mechanical edits, Sonnet is often good enough and will burn through far less of your budget. A reasonable middle ground is to start a session in Opus for planning, then switch to Sonnet with /model for the actual code generation. For this walkthrough I kept Opus on the whole time to keep things simple.
The /init command
Run /init inside Claude Code to scan your project and generate a CLAUDE.md file. This file captures project context: structure, main files, dependencies, and conventions.
Why this matters: Claude reads CLAUDE.md at the start of every session. It learns about your components and services once, so you do not need to explain the project again each time. You can also pass an argument to /init, for example /init focus on Blazor components and services.
For our project I used the following prompt:
- /init Generate instructions for this Blazor app. Use MudBlazor for UI components. Tests should use NSubstitute and Shouldly NuGet packages.
Side note: we are going to use the free MudBlazor component library, which is one of the most popular UI kits in the Blazor ecosystem.
When the command finishes, click CLAUDE.md in VS Code and press Ctrl+Shift+V to open it in preview mode.
Every time you run /init, the output will be a bit different. Claude is a large language model and its responses are non-deterministic by nature, so do not expect byte-identical results.
Claude Code modes
Claude Code has three main modes:
- Default mode — Claude reads, writes, and edits files directly, asking for confirmation on certain actions. Good for small, focused changes.
- Auto-accept mode — Claude executes actions without asking for confirmation. Fastest, but you give up some control.
- Plan mode — Claude analyzes the task and produces a step-by-step plan first. No files are changed until you approve the plan.
For this project I use plan mode most of the time. The reason: our app requirements live in PRD.md. Plan mode lets Claude read the PRD, think about the full scope, and propose a clear implementation plan before writing any code. That way I can review the approach first and catch a wrong direction before it turns into wasted work.
To switch modes, press Shift+Tab in the Claude Code terminal. Each press cycles to the next mode.
The /clear command
/clear resets the current conversation in Claude Code. It wipes the context window – chat history, files Claude has read, and previous decisions are all forgotten. Only CLAUDE.md is loaded again on the next message.
The reasoning behind it: Claude has a limited context window. The longer a session runs, the more tokens get spent on old messages. This slows responses, increases cost, and can confuse Claude with outdated information from earlier in the conversation.
When to use /clear:
- You finished a task and are starting a new, unrelated one.
- The conversation has become long and Claude starts to lose focus.
- You want a fresh start without restarting the CLI.
The /context command
To see what is currently in Claude’s head, run /context. It prints a breakdown of the context window – the working memory Claude has for the session – showing what is taking up space and how much is left.
The main sections you will see:
- System prompt – built-in instructions. Fixed overhead.
- System tools – definitions of the tools Claude Code has available. Fixed overhead.
- Memory files – CLAUDE.md and PRD.md in our case.
- Skills – instructions for specialized capabilities Claude can use.
- Messages – the chat history of the current session. This is what grows the fastest.
- Free space – what is left for the next response.
MCP tools are listed separately below the usage breakdown. They are loaded on demand, so they only consume context when Claude actually calls one.
When the window fills up past roughly 80 percent, quality drops noticeably. That is your cue to run /clear and start fresh.
Step 3: Create the PRD.md document
Before writing any code, we create a PRD.md (Product Requirements Document). This file describes what the app does, which features it has, and which bugs need to be fixed. Claude reads it in plan mode and uses it as the source of truth for the project.
Structure of PRD.md
The document is written in natural language, not only bullet points. Each section explains the context and reasoning, so Claude understands not just what to build but why.
This is only one way to work with Claude Code. You do not have to create a PRD.md – you can describe requirements directly in the chat, or use any other format that fits your workflow. I find the PRD approach useful because it forces me to think the project through before any code is written.
Generating the PRD
Here is the prompt I used:
Application goal:
The goal of this application is to connect to an Azure subscription and display the list of resources in a grid with common properties (name, type, resource group, location, status). From the grid, the user can open a details view for a selected resource, where resource-specific attributes are shown. Azure CLI only (dev) — relies on the developer already being logged in via ‘az login’ on the host machine.
Create a PRD.md file in the project root for this Blazor app. The document must contain:
- – A table of contents with links to all sections
- – An overview section describing the app and its users
- – A features section, where each feature has its own subsection written in prose, including user story and acceptance criteria
- – An empty bugs section as a placeholder for future bugs
- Do not invent or add any features or bugs on your own. Only include features that I describe to you. Leave the bugs section empty.
- Write the content in natural language, not only bullet lists. Ask me questions about the features I describe if you need more details before writing the document.
Tip: let Claude write the prompt
You can ask Claude to write a prompt for you. Just explain what you want and finish with: “Write a prompt for this.”
Why it helps: Claude knows which words and structure work best for itself. The resulting prompt is usually better than one written by hand, especially for non-native English speakers.
Running the prompt
Reset the session with /clear and paste the prompt above in the Claude CLI in plan mode.

While Claude works on the prompt, it will probably ask you some questions to clarify details. These questions will be different for each user, because Claude adapts them to your project and your answers. Do not worry too much about your answers here – we will describe all features in detail later in the PRD itself.
At the end, Claude will tell you the plan is ready and ask whether to proceed. Answer yes and switch to auto-accept mode, so Claude can execute the plan without asking for confirmation on every step.
When the PRD is ready, run this follow-up prompt to wire it into CLAUDE.md:
- Update the CLAUDE.md file to reference the PRD.md document. Add a section that tells Claude to read PRD.md at the start of every session, because PRD.md contains the source of truth for application features, requirements, and known bugs.
In my case, Claude generated a PRD that looked like this:
Step 4: First feature – hardcoded list of resources
With the PRD in place, we can start adding features. Clear the session and run the following prompt in plan mode:
Add a new feature to the PRD.md document with the following requirement:
Feature – Resources List:
- – Add a new menu item called “Resources” in the main navigation
- – When the user clicks the menu item, display a page with a MudBlazor data grid
- – The grid must show the following columns: Name, Type, Resource Group, Location, Subscription, Status
- – For now, use 20 hardcoded example resources as the data source (real Azure integration will come later)
Write the feature in the same prose style as the rest of the document, including a user story and acceptance criteria. Ask me questions if you need more details before updating the file.
Tip: stop the debugger before starting a new feature. Running the app while Claude edits files can cause file-lock errors and confuse the build. If something does not work, paste the exception from the Debug window into Claude – it will usually pick up the cause from the stack trace alone.
Claude will generate the new feature section in the PRD.md document. Once you are happy with it, run:
Implement the feature
When Claude finishes, press F5 and the app should look something like this:
Step 5: First bug fixes
Now that we have one real feature, let us clean up two issues from the default template. Clear the session and run this prompt in plan mode:
Add the following bugs to the bugs section of the PRD.md document:
Bug 1: Leftover template menu items
The “Weather” and “Counter” menu items are still present in the navigation. They come from the default Blazor template and must be removed, because they are not part of this application.
Bug 2: Empty home page
The home page does not contain any information about the project. It should describe what the application does and its main purpose, so users understand the app when they open it for the first time. Write each bug in the same prose style as the rest of the document, including description, steps to reproduce, and expected behaviour. Do not change any other section of the file.
Claude will add bugs description in the PRD.md document.
Then run:
Fix these bugs
The result should look like this:
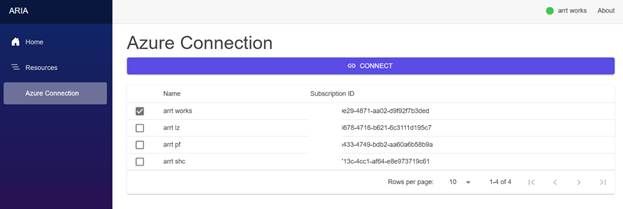
Step 6: Subscription list and selection
Time to actually talk to Azure. Clear the session and run in plan mode:
Add a new feature to the PRD.md document with the following requirement:
Feature – Azure Connection:
– Add a new menu item called “Azure Connection” in the main navigation
– The Connection page contains a “Connect” button at the top
– Assumption: the user is already logged in via “az login” on their machine, so the app uses the existing credentials and does not handle authentication
– When the user clicks “Connect”, the app loads the list of available Azure subscriptions and displays them in a MudBlazor data grid below the button
– The user can select the current (active) subscription from the data grid
– The top bar of the application must always show:
– The name of the currently selected subscription
– A connection status indicator: green when connected, red when not connected – Initial state: before the user connects, the top bar must not show a subscription name. Instead, it shows a message like “Not connected” with a red status indicator.
Write the feature in the same prose style as the rest of the document, including a user story and acceptance criteria. Do not change any other section of the file. Ask me questions if you need more details before updating the file.
Then run:
Implement the feature
You should end up with something like this:
When something does not work
Claude Code is good, but it is not magic. At some point a button will not do what you expect, a page will throw a 500, or the app will not even start. That is normal. The right reflex is not to start poking around the generated code yourself – it is to tell Claude exactly what is wrong and let it fix its own work.
The pattern that works for me:
- Describe the symptom in one sentence. Not “it is broken” – something like “the Connect button on the Azure Connection page does nothing when I click it”. The more concrete, the better.
- Paste the actual error. If there is an exception in the VS Code Debug Console, copy it in full – message, stack trace, inner exception. If it is a build error, paste the compiler output. If it is a runtime error in the browser, open DevTools (F12), check the Console and Network tabs, and paste whatever red text you find there.
- Tell Claude what you already tried. If you restarted the app, cleared the browser cache, or ran az login again, mention it. Otherwise Claude will suggest the same things back to you and waste a round.
A prompt that hits all three points looks like this:
The Connect button on the Azure Connection page does nothing when I click it. No subscriptions show up, no error in the UI. In the Debug Console I see this exception: System.AggregateException: One or more errors occurred. (DefaultAzureCredential failed to retrieve a token from the included credentials.) —> Azure.Identity.CredentialUnavailableException: … at Azure.Identity.DefaultAzureCredential.GetTokenAsync(…) I have already run ‘az login’ in the terminal and ‘az account show’ returns my correct subscription. The app was restarted after the last code change. What is going on?
Claude will usually identify the cause from the stack trace alone and propose a fix. If the fix does not work, paste the new error the same way and keep going. It is much faster than trying to debug yourself in a framework you do not know well.
One more thing: if Claude proposes a fix that feels suspicious – for example, swallowing the exception, hardcoding a workaround, or disabling something that should work – push back. Tell it the proposed fix hides the problem instead of solving it and ask for the actual cause. The model is happy to go deeper when you ask, but it will sometimes pick the path of least resistance if you do not.
Wrapping up
At this point we have a working Blazor app that connects to Azure with the user’s local credentials and shows the list of subscriptions. The next steps will be to replace the hardcoded resources list with a real call to the Azure SDK, and to add the per-resource details page. I will cover those in the next post.
What I want to highlight from this walkthrough:
- A short PRD costs you ten minutes and saves you hours of misunderstandings later.
- Plan mode is worth the extra step. Reviewing the plan is much faster than reviewing a wrong implementation.
- /clear between tasks keeps Claude sharp. Resist the urge to keep one long session running for the whole day.
Git is non-negotiable. Commit after every successful feature so you always have a known-good
If you have been curious about AI assisted development but assumed you needed to learn an entire framework before building something useful, hopefully this walkthrough shows it is far easier to get started than most people think. Stay tuned for part two, where I’ll replace the hardcoded resources data with real Azure SDK integration and cover some of the issues and fixes that came up along the way.

Author: Damian Sliwinski
Azure Integration Developer


follow us